This tutorial was made to be a quick-start guide for Maya users who need to bring their 3D models or entire scenes online. Here we outline the most straightforward Maya-to-WebGL pipeline based on the Verge3D toolkit. Why this one? Read further to find out!

The Plan
- First, we download and install Verge3D for Maya.
- Then we create a new WebGL project using a ready-to-use template.
- After that, we add our own models to the project and export.
- Finally, we publish the complete project on the Web.
A Few Words About WebGL
WebGL is an impressive browser feature that allows you to render interactive 3D graphics right on the web page, without the need to download anything or use any third-party plug-ins. The technology is quite sophisticated, that’s why there are many WebGL toolkits were created to make your life more comfortable.
One of them is Verge3D, a framework that features a comprehensive integration with Autodesk Maya, a physically-based rendering pipeline, support for native materials, lights and shadows, and of course, animation. The idea behind Verge3D is that you use only the out-of-the-box features of Maya as such, get the results closer to the viewport.
Step 1. Getting Started
On Windows, simply download Verge3D for Maya and run the .exe file so it unpacks to a directory of your choice. For macOS or Linux, the installation process is a bit different, follow the installation procedure described in the official user manual.
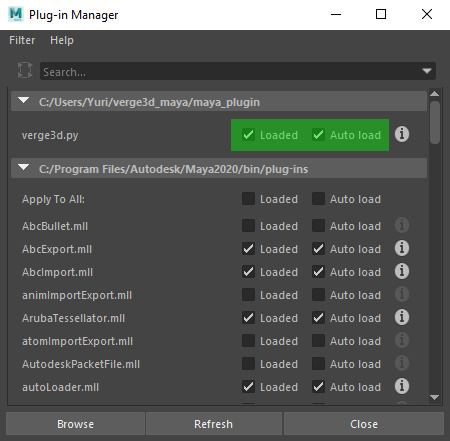
After installation is complete, run Maya and select Windows > Settings/Preferences > Plug-in Manager… in the main menu bar.
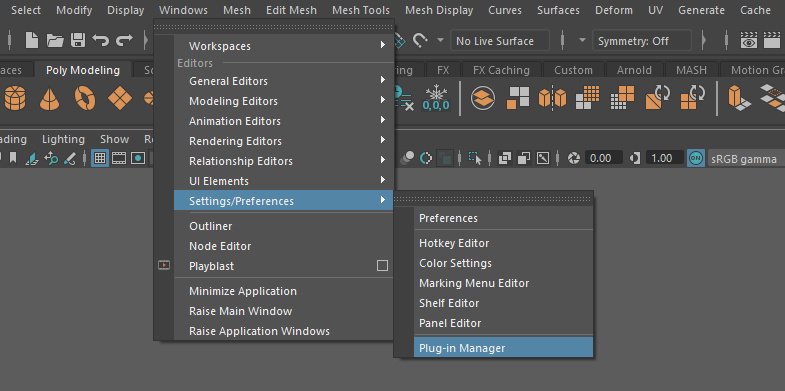
Activate Verge3D plug-in by enabling both Loaded and Auto load checkers.
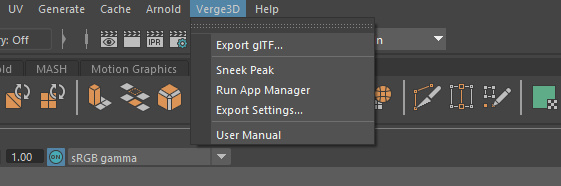
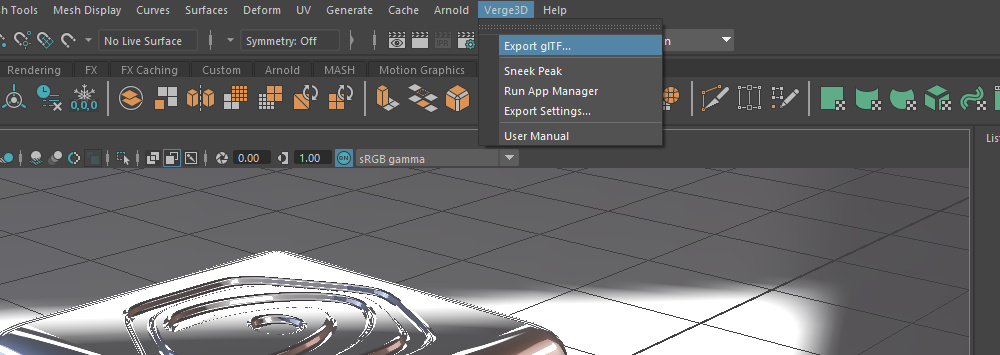
You should see the Verge3D menu in the main menu bar now. The most important feature available from this menu is called Sneak Peek. By using it you can immediately preview your scene in a new browser tab!
Step 2. Creating a new WebGL Project
Now it’s time to create a new WebGL project by using App Manager. App Manager is a web-based tool that opens up in the browser when you select the Run App Manager… menu entry.
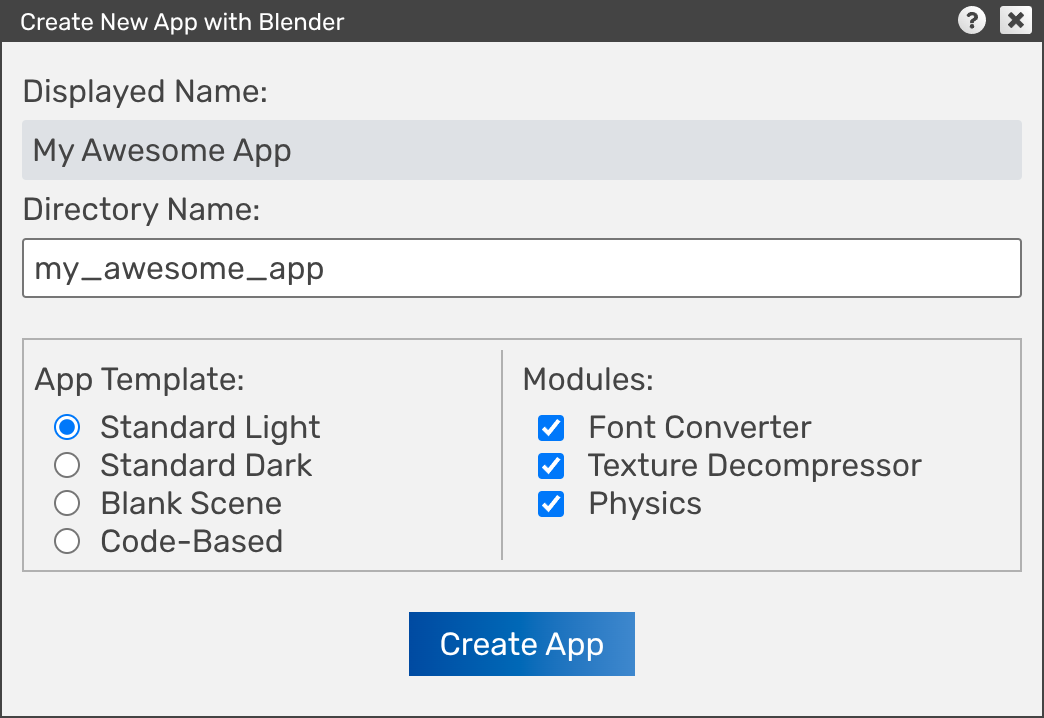
You can create a new project using the toolbar icon on the left. Just enter a project name (My Awesome App will also work) and click Create App. You can safely leave other options as is.
After you created a project, look at the main screen of the App Manager – your project should be listed there. Now you can proceed with your app in several directions: simply running it, authoring the graphics, creating interactive scenarios, and finally, publishing.

You can run your app any time by clicking the Verge3D icons, either the blue or the green one. The blue icon launches an app in its final form, with its Puzzles scenario and the programming code. On the contrary, the green icon only opens the exported scene.
Step 3. Adding Maya Assets and Exporting
Clicking on the red Maya icon opens up the main .mb file of your application. You can simply edit this file or completely replace it with your own asset.
Exporting is performed from the Verge3D > Export glTF… menu in Maya. You can export your scene file right to the root of the application folder, in the WebGL-friendly format called glTF.
After successful export, launch your app by clicking the blue Verge3D logo icon in the App Manager.
Step 4. Publishing
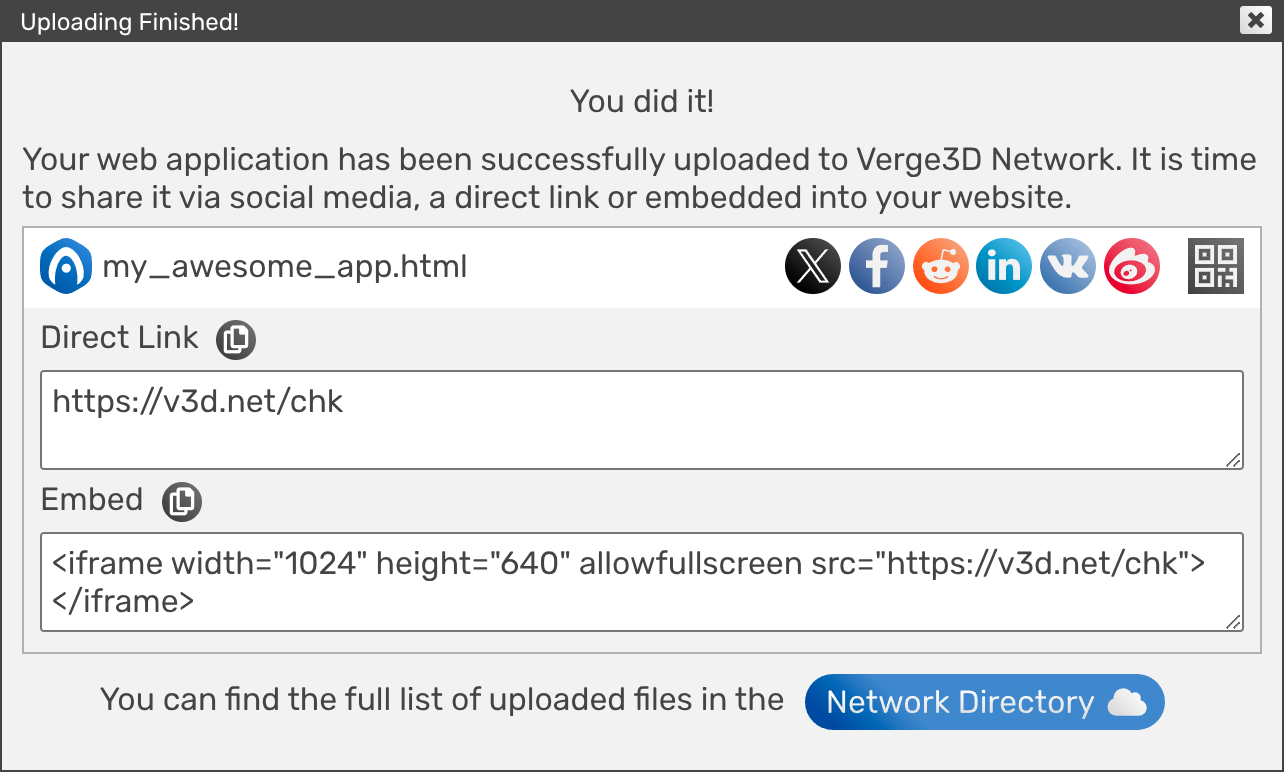
You’ve created a web application and probably you’d like the zillions of Internet users to come and check it out. If you own a website, this won’t be a problem – simply upload the entire folder with your application to your server (for example, via hosting control panel or FTP).
But what if you haven’t had the chance to become a webmaster? Actually, there is a button for that in the App Manager (one with the “Up” icon). Clicking that button will upload your app to the Verge3D Network, a distributed hosting platform which comes with Verge3D.

You have many options here: you can share a public link to your app or create a new post using your social media account.
Next Steps
In this step-by-step guide, we used Verge3D as a comprehensive web exporter, which “just” generates live WebGL views running in the browser. But you can do much, much more! With Puzzles, the powerful yet entertaining scripting environment which comes with Verge3D, you no longer have to be a programmer to do… programming. Try it out!
This is just a brief overview of the Verge3D workflow with many topics possibly left undiscussed. Check out the Beginner’s Guide to learn about more exciting features of this framework.
Update 2026-03-24
Update links and screenshots.
Hello,
Nice Article. I am trying to developing a conversational agent. I request you to please respond to the following questions:
a) Is it possible to publish a talking 3D character using WebGL?
b) Is there any additional development effort required for LipSync to work on the published model using WebGL?
c) Can I configure the audio files dynamically or use text-to-Speech APIs?
–Shafi
Hi,
This is quite straightforward, but might require some JavaScript coding. For starter, you need to create an animated character, then parse input vocal data (provided as audio files or text-to-speech) with WebAudio API, then use that processed data to drive mouth movements of the character. If you need more info, you might want to discuss details with the Verge3D developers on the forums.