Creating 3D web experiences from CAD data

In this article, we explain how to convert 3D data from various CAD (CAM/CAE/BIM) software formats to present it on the web as high-quality interactive visuals, configurators, explainers, or AR/VR experiences.
Introduction
There are plenty of tools that can be used to convert CAD assets to polygonal geometry or visualize them directly. Some of the CAD packages (e.g. Autodesk Fusion, FreeCAD, Rhino) can export to web-friendly glTF files. However, these fully automatic approaches have really serious issues:
- Low flexibility when it comes to quality. You either get extremely high polygon counts or low-quality meshes.
- Excessive geometry. Invisible parts remain in the mesh inflating the size of the target asset and reducing rendering performance.
- Format-specific artifacts. Converting parametric geometry (B-Rep, NURBS) into polygons often results in tessellation artifacts, such as shading errors, normal distortion, or visible surface faceting. You must have the ability to fix them manually.
- Missing or unrealistic materials. Most CAD tools intentionally omit features for realistic model visualization.
- Missing UVs. Most B-Rep CAD software can't generate UVs, making it impossible to assign complex materials to your meshes (e.g. with textures, AO maps, normal maps, etc.).
What's even more important, with direct visualization you can't implement features most users expect to see in your 3D web apps: photoreal lighting, camera controls, true interactivity, animations, customizations, exploding views, AR/VR, integration with HTML/CSS, etc.
In this article we suggest another approach, based on using intermediate 3D modeling suites: 3ds Max, Blender, Maya.
- 3ds Max — this is one of the best tools when it comes to visualizing CAD data, as it offers good interoperability with most popular CAD software you can find on the market: SolidWorks, Inventor, Siemens NX, CATIA, PTC Creo, Revit.
- Blender — free yet powerful 3D modeling and animation suite. Out of the box, it is less capable with CAD assets, but has many third-party extensions to cope with it.
- Maya — professional 3D software with advanced rigging, animation, and simulation capabilities. Less capable than 3ds Max when dealing with CAD assets, but has an important advantage of being cross-platform — works on Windows, macOS, and Linux.
All three packages are supported by Verge3D toolkit, allowing you to utilize an artist-friendly pipeline for creating 3D web experiences. Moreover, you can easily add interactivity with Puzzles, the visual logic editor included with Verge3D.
STEP (.stp, .step)
It is a standard for the exchange of product data, also known as ISO 10303, and is used to share exact 3D models across different software. Transferring exact mathematical solid geometry (NURBS) between different mechanical CAD platforms (e.g., SolidWorks to CATIA) and CNC manufacturing.
The rule of thumb is as follows: If you have the means to bring a native CAD asset into 3ds Max, Blender, or Maya, you should go that way. If not, consider using the STEP format as an intermediary. If STEP does not work for you (e.g., if it causes excessive artifacts when dealing with very complex models), stick to direct FBX/OBJ/STL export, relying on the built-in tessellation algorithm of the chosen CAD software.
STEP to 3ds Max
Importing STEP files is supported by 3ds Max natively:
- Invoke File → Import → Import...
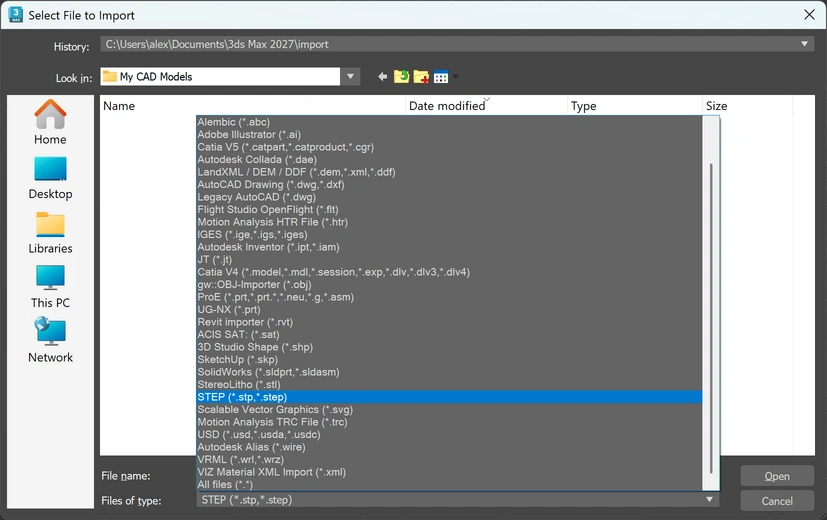
- Select STEP (*.stp, *.step) from the Files of type dropdown menu:
- Import the CAD asset to 3ds Max
- Optimize geometry, assign materials, setup camera and lighting
- Preview in the browser with Verge3D → Sneak Peek...
- Export to HTML or continue with a full-scale Verge3D project

STEP to Blender
Blender does not support importing STEP files by default, so you should use third-party extensions:
STEP Importer by Clonephaze — free, can be installed from Blender preferences:

SimLab STEP Importer — paid, offers more features, has 14-days trial version.
Once you have your STEP asset imported, perform the following steps:
- Optimize geometry, assign materials, setup camera and lighting
- Preview in the browser with the Sneak Peek button
- Export to HTML or continue with a full-scale Verge3D project
STEP to Maya
Windows, macOS, Linux versions of Maya have different capabilities when it comes to importing STEP files.
Windows
Use Autodesk Translation Framework (ATF). Invoke File → Import..., then select STEP_ATF.

macOS
ATF is not supported for macOS version of Maya. To import STEP use one of the alternative options:
- Import STEP using Windows version of Maya, save .mb/.ma scene, then open it on macOS
- Use intermediate CAD supported on macOS, e.g. Rhino 3D (STEP → Rhino → FBX → Maya)
- Use Blender (STEP → Blender → FBX → Maya)
Linux
ATF is not supported for Linux version of Maya. To import STEP use one of the alternative options:
- Import STEP using Windows version of Maya, save .mb/.ma scene, then open it on Linux
- Use Blender (STEP → Blender → FBX → Maya)
Once you have your STEP asset imported, perform the following steps:
- Optimize geometry, assign materials, setup camera and lighting
- Preview in the browser with Verge3D → Sneak Peek
- Export to HTML or continue with a full-scale Verge3D project
JT (.jt)
Jupiter Tessellation. ISO standard widely used in automotive and heavy equipment manufacturing. Enterprise visualization, digital mockup, and assembly inspection.
JT to 3ds Max
Importing JT files is supported by 3ds Max natively:
- Invoke File → Import → Import...
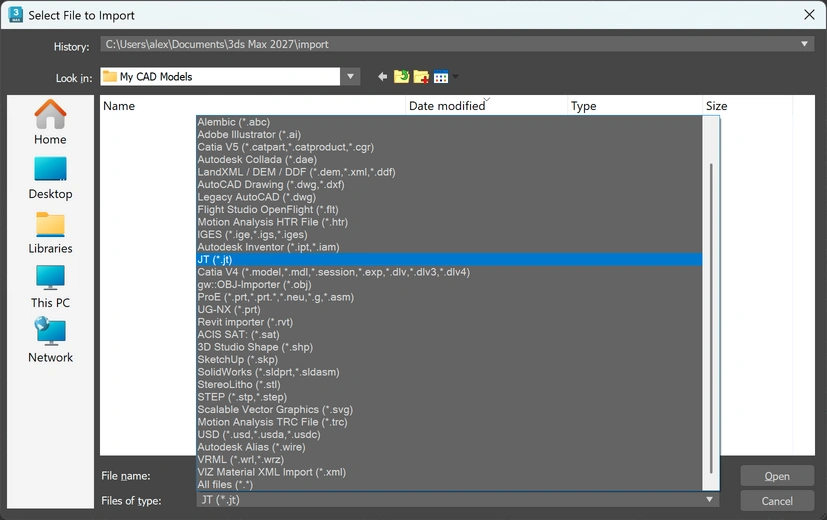
- Select JT (*.jt) from the Files of type dropdown menu:
- Import the CAD asset to 3ds Max
- Optimize geometry, assign materials, setup camera and lighting
- Preview in the browser with Verge3D → Sneak Peek...
- Export to HTML or continue with a full-scale Verge3D project

JT to Blender
Use SimLab JT Importer extension.
Once you have your JT asset imported, perform the following steps:
- Optimize geometry, assign materials, setup camera and lighting
- Preview in the browser with the Sneak Peek button
- Export to HTML or continue with a full-scale Verge3D project
JT to Maya
Use Autodesk Translation Framework (Windows only).
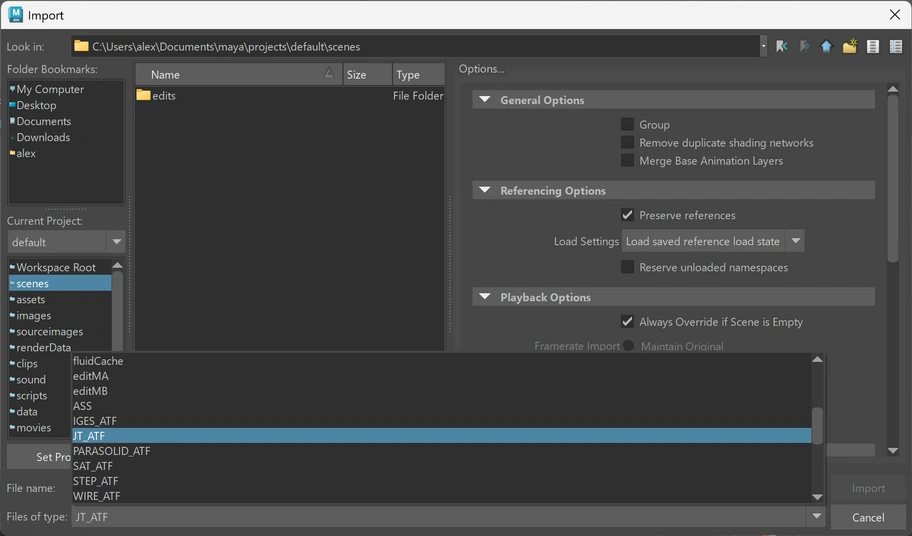
- Invoke File → Import..., then select JT_ATF:
- Import the CAD asset to Maya
- Optimize geometry, assign materials, setup camera and lighting
- Preview in the browser with Verge3D → Sneak Peek
- Export to HTML or continue with a full-scale Verge3D project

IGES (.igs, .iges)
The Initial Graphics Exchange Specification is a legacy open standard (mostly replaced by STEP, but still ubiquitous in aerospace).
IGES to 3ds Max
Importing IGES files is supported by 3ds Max natively:
- Invoke File → Import → Import...
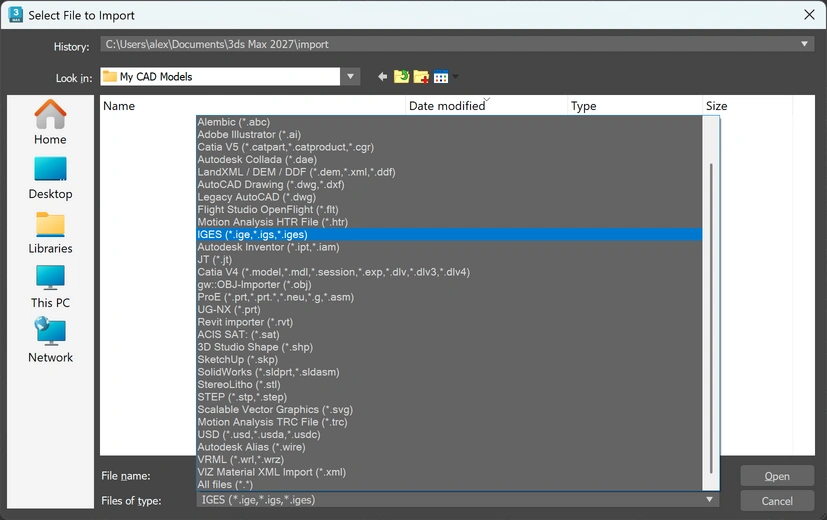
- Select IGES (*.ige, *.igs, *.iges) from the Files of type dropdown menu
- Import the CAD asset to 3ds Max
- Optimize geometry, assign materials, setup camera and lighting
- Preview in the browser with Verge3D → Sneak Peek...
- Export to HTML or continue with a full-scale Verge3D project

IGES to Blender
Since Blender does not support IGES assets natively, use FreeCAD as intermediate tool:
- Import an IGES file to FreeCAD
- Export from FreeCAD to OBJ
- Import OBJ in Blender via File → Import → Wavefront (.obj)
- Optimize geometry, assign materials, setup camera and lighting
- Preview in the browser with the Sneak Peek button
- Export to HTML or continue with a full-scale Verge3D project
IGES to Maya
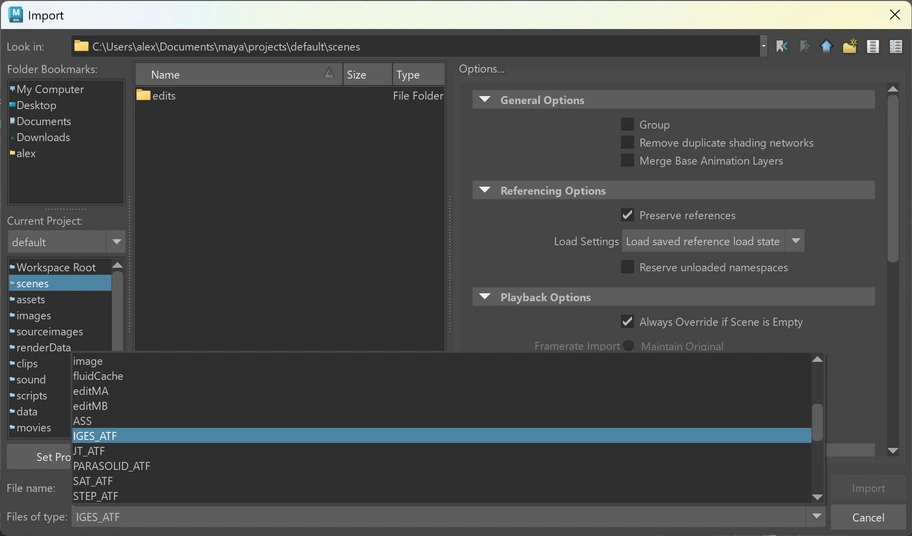
Use Autodesk Translation Framework (Windows only).
- Invoke File → Import..., then select IGES_ATF:
- Import the CAD asset to Maya
- Optimize geometry, assign materials, setup camera and lighting
- Preview in the browser with Verge3D → Sneak Peek
- Export to HTML or continue with a full-scale Verge3D project

IFC (.ifc)
Industry Foundation Classes. The open standard for Building Information Modeling (BIM) in Architecture, Engineering, & Construction (AEC).
IFC to 3ds Max
You have two options:
- Install the open-source IfcMax plugin by Josef Wienerroither (based on the IfcOpenShell library)
- Open your IFC file in an intermediary application like AutoCAD, Revit, or Civil 3D, and export or save it as a native DWG or FBX file, which 3ds Max imports natively
IFC to Blender
Installing the free Bonsai (BlenderBIM) extension converts Blender into a fully compliant IFC authoring and editing tool.
Once you have your IFC asset imported, perform the following steps:
- Optimize geometry, assign materials, setup camera and lighting
- Preview in the browser with the Sneak Peek button
- Export to HTML or continue with a full-scale Verge3D project
IFC to Maya
- Import IFC to Blender with Bonsai (BlenderBIM) extension
- Export the scene to FBX
- Import FBX in Maya
- Optimize geometry, assign materials, setup camera and lighting
- Preview in the browser with Verge3D → Sneak Peek
- Export to HTML or continue with a full-scale Verge3D project
CATIA (.CATPart, .CATProduct)
Used for aerospace, automotive, shipbuilding.
CATIA to 3ds Max
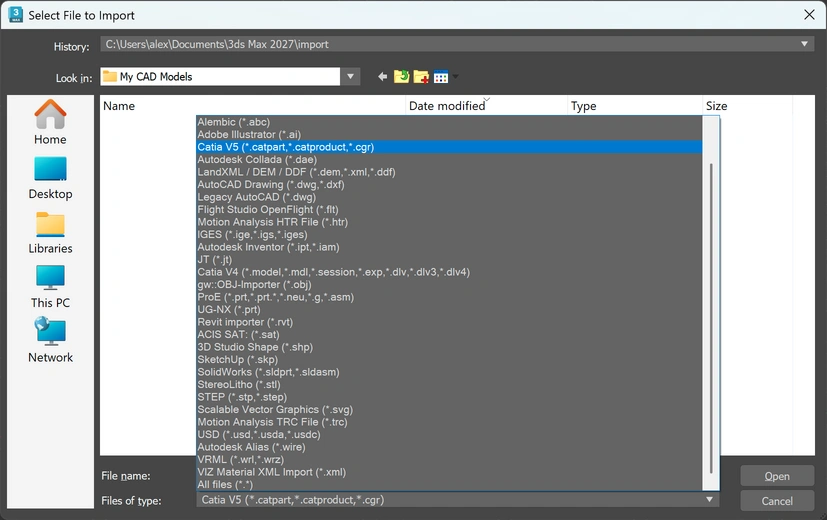
Importing CATIA files is supported by 3ds Max natively:
- Invoke File → Import → Import...
- Select CATIA V5 (*.catpart, *.catproduct, *.cgr) from the Files of type dropdown menu:
- Import the CAD asset to 3ds Max
- Optimize geometry, assign materials, setup camera and lighting
- Preview in the browser with Verge3D → Sneak Peek...
- Export to HTML or continue with a full-scale Verge3D project

CATIA to Blender
- Export from CATIA to OBJ
- Import OBJ to Blender via File → Import → Wavefront (.obj)
- Optimize geometry, assign materials, setup camera and lighting
- Preview in the browser with the Sneak Peek button
- Export to HTML or continue with a full-scale Verge3D project
CATIA to Maya
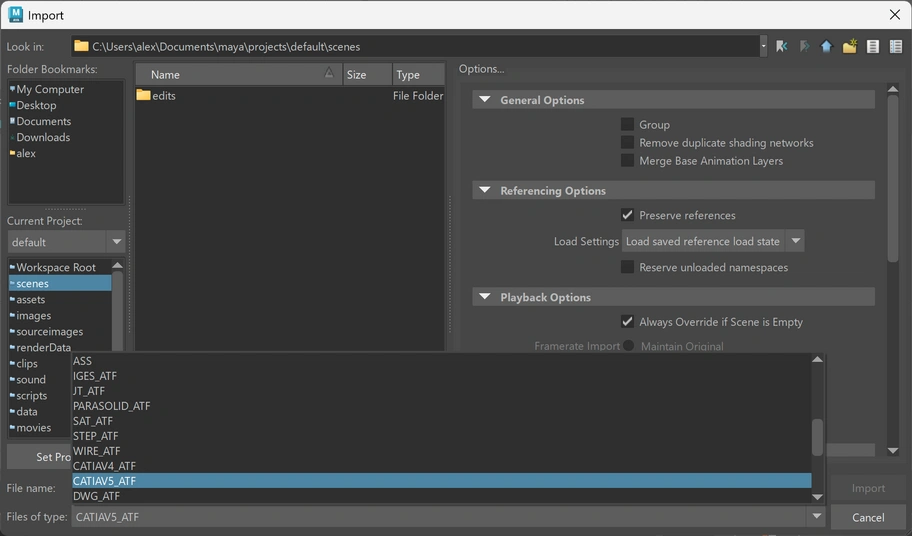
Use Autodesk Translation Framework (Windows only).
- Invoke File → Import..., then select CATIAV5_ATF:
- Import the CAD asset to Maya
- Optimize geometry, assign materials, setup camera and lighting
- Preview in the browser with Verge3D → Sneak Peek
- Export to HTML or continue with a full-scale Verge3D project

SolidWorks (.sldprt, .sldasm)
Used for industrial machinery, consumer hardware, medical devices.
SolidWorks to 3ds Max
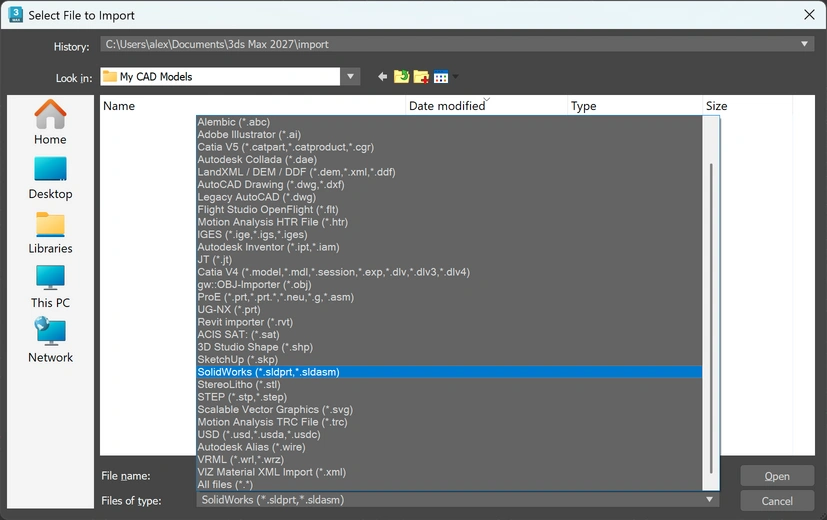
Importing SolidWorks files is supported by 3ds Max natively:
- Invoke File → Import → Import...
- Select SolidWorks (*.sldprt, *.sldasm) from the Files of type dropdown menu:
- Import the CAD asset to 3ds Max
- Optimize geometry, assign materials, setup camera and lighting
- Preview in the browser with Verge3D → Sneak Peek...
- Export to HTML or continue with a full-scale Verge3D project

See also the info from the Verge3D FAQ.
SolidWorks to Blender
- Export from SolidWorks to OBJ
- Import OBJ to Blender via File → Import → Wavefront (.obj)
- Optimize geometry, assign materials, setup camera and lighting
- Preview in the browser with the Sneak Peek button
- Export to HTML or continue with a full-scale Verge3D project
SolidWorks to Maya
There is no built-in support for SolidWorks files in Maya (even on Windows). Instead, you should use one of the following methods:
- Save your file as Parasolid (.x_t or .x_b) inside SolidWorks, then import it in Maya: invoke File → Import..., then select PARASOLID_ATF
- Export from SolidWorks to a STEP file (.step or .stp), then import it in Maya: invoke File → Import..., then select STEP_ATF
Siemens NX (.prt)
Formerly known as Unigraphics NX. Used for CAD/CAM/CAE in automotive, high-tech electronics, and heavy machinery industries.
Siemens NX to 3ds Max
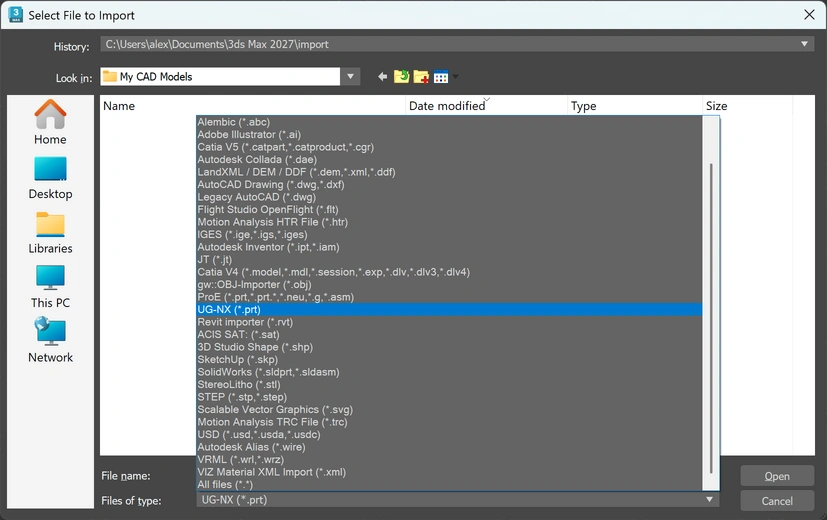
Importing Siemens NX files is supported by 3ds Max natively:
- Invoke File → Import → Import...
- Select UG-NX (*.prt) from the Files of type dropdown menu:
- Import the CAD asset to 3ds Max
- Optimize geometry, assign materials, setup camera and lighting
- Preview in the browser with Verge3D → Sneak Peek...
- Export to HTML or continue with a full-scale Verge3D project

Siemens NX to Blender
- Export your Siemens NX asset to STEP
- Import STEP in Blender as described above
- Optimize geometry, assign materials, setup camera and lighting
- Preview in the browser with the Sneak Peek button
- Export to HTML or continue with a full-scale Verge3D project
Siemens NX to Maya
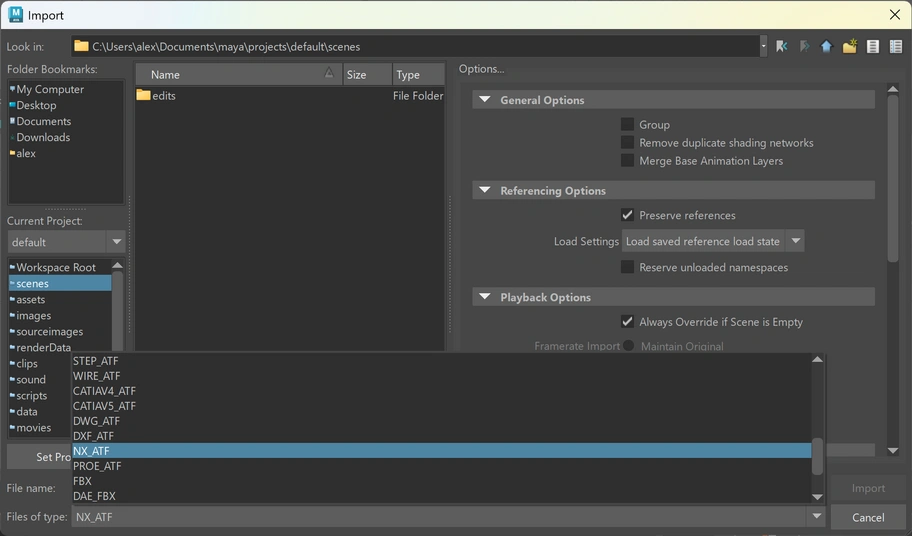
Use Autodesk Translation Framework (Windows only).
- Invoke File → Import..., then select NX_ATF:
- Import the CAD asset to Maya
- Optimize geometry, assign materials, setup camera and lighting
- Preview in the browser with Verge3D → Sneak Peek
- Export to HTML or continue with a full-scale Verge3D project

PTC Creo aka Pro/ENGINEER (.prt, .asm)
Used for heavy equipment, industrial design.
PTC Creo to 3ds Max
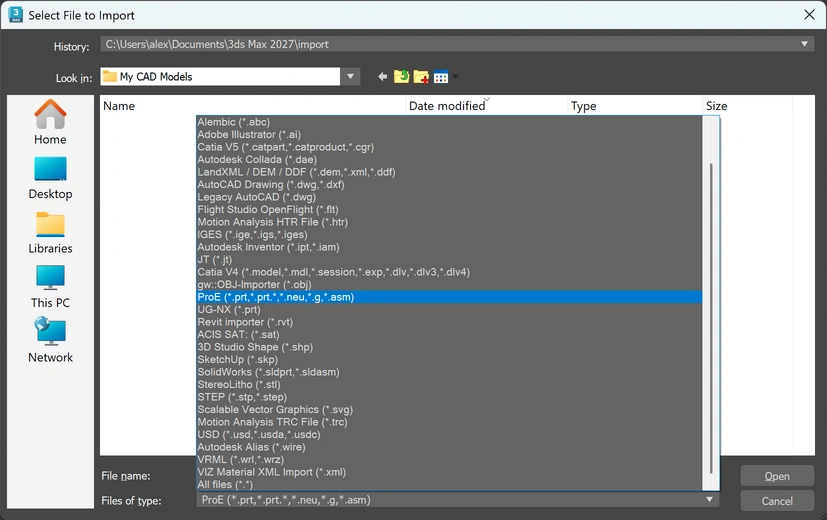
Importing PTC Creo files is supported by 3ds Max natively:
- Invoke File → Import → Import...
- Select ProE (*.prt, *.prt.*, *.neu, *.g, *.asm) from the Files of type dropdown menu:
- Import the CAD asset to 3ds Max
- Optimize geometry, assign materials, setup camera and lighting
- Preview in the browser with Verge3D → Sneak Peek...
- Export to HTML or continue with a full-scale Verge3D project

PTC Creo to Blender
- Export from Creo to OBJ
- Import OBJ to Blender via File → Import → Wavefront (.obj)
- Optimize geometry, assign materials, setup camera and lighting
- Preview in the browser with the Sneak Peek button
- Export to HTML or continue with a full-scale Verge3D project
PTC Creo to Maya
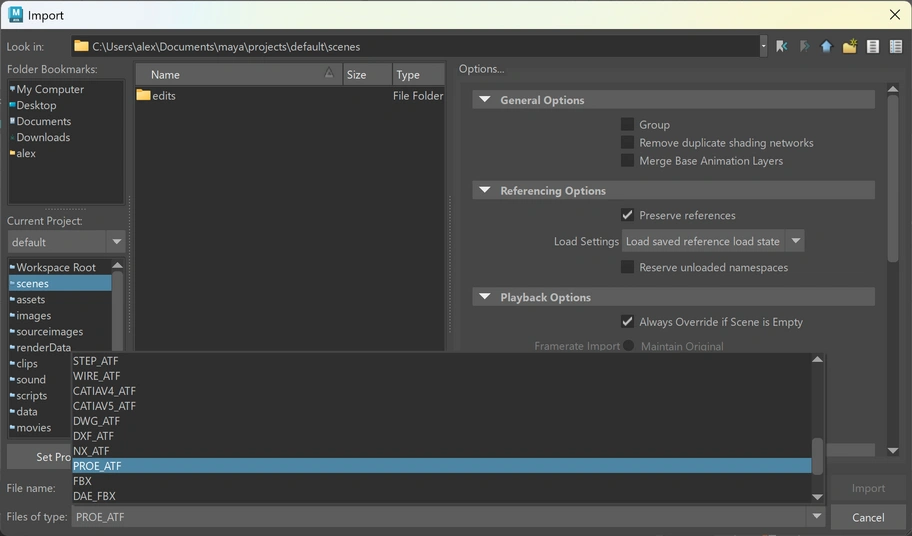
Use Autodesk Translation Framework (Windows only).
- Invoke File → Import..., then select PROE_ATF:
- Import the CAD asset to Maya
- Optimize geometry, assign materials, setup camera and lighting
- Preview in the browser with Verge3D → Sneak Peek
- Export to HTML or continue with a full-scale Verge3D project

Autodesk Inventor (.ipt, .iam)
Used for general mechanical engineering and manufacturing.
Inventor to 3ds Max
Importing Autodesk Inventor files is supported by 3ds Max natively:
- Invoke File → Import → Import...
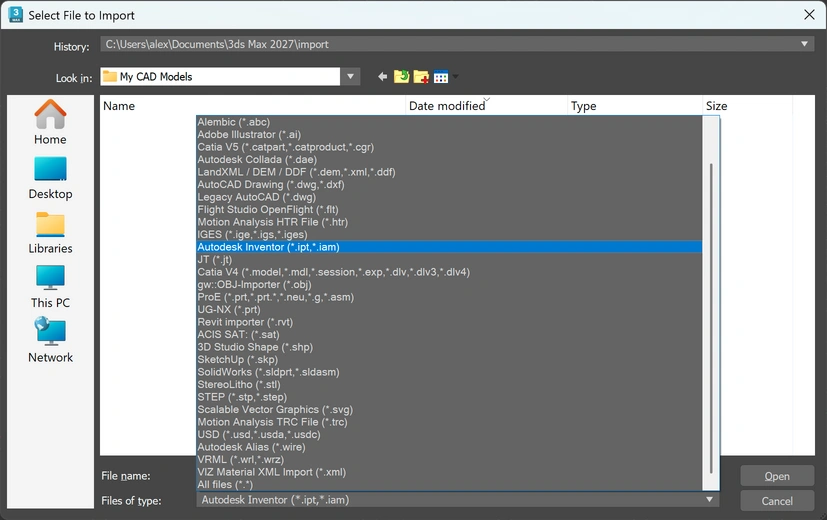
- Select Autodesk Inventor (*.ipt, *.iam) from the Files of type dropdown menu:
- Import the CAD asset to 3ds Max
- Optimize geometry, assign materials, setup camera and lighting
- Preview in the browser with Verge3D → Sneak Peek...
- Export to HTML or continue with a full-scale Verge3D project

Inventor to Blender
Blender does not support importing Inventor assets, while Inventor does not support exporting to OBJ/FBX. This means you should use STEP as intermediate format:
- Export your scene from Inventor to STEP
- Import STEP in Blender as described above
- Optimize geometry, assign materials, setup camera and lighting
- Preview in the browser with the Sneak Peek button
- Export to HTML or continue with a full-scale Verge3D project
Inventor to Maya
- Export your scene from Inventor to a STEP file
- Import STEP to Maya via Autodesk Translation Framework: invoke File → Import..., then select STEP_ATF
- Optimize geometry, assign materials, setup camera and lighting
- Preview in the browser with Verge3D → Sneak Peek
- Export to HTML or continue with a full-scale Verge3D project
Autodesk Revit (.rvt)
Architecture, structural engineering, facilities management (BIM).
Revit to 3ds Max
Importing Autodesk Revit files is supported by 3ds Max natively:
- Invoke File → Import → Import...
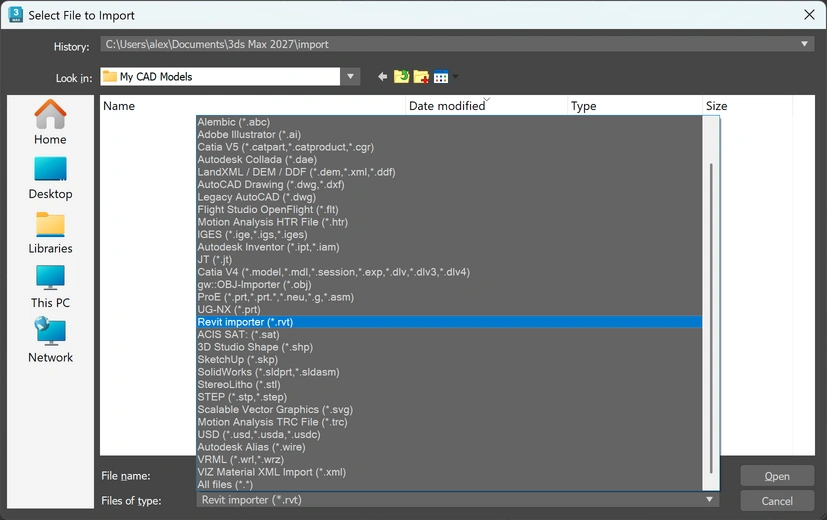
- Select Revit importer (*.rvt) from the Files of type dropdown menu:
- Import the CAD asset to 3ds Max
- Optimize geometry, assign materials, setup camera and lighting
- Preview in the browser with Verge3D → Sneak Peek...
- Export to HTML or continue with a full-scale Verge3D project

See also the info from the Verge3D FAQ.
Revit to Blender
- Export from Revit to FBX
- Import FBX to Blender via File → Import → FBX (.fbx)
- Optimize geometry, assign materials, setup camera and lighting
- Preview in the browser with the Sneak Peek button
- Export to HTML or continue with a full-scale Verge3D project
Revit to Maya
There is no built-in support for Revit files in Maya.
- Export from Revit to FBX
- In Maya invoke File → Import..., then select FBX
- Import the FBX asset to Maya
- Optimize geometry, assign materials, setup camera and lighting
- Preview in the browser with Verge3D → Sneak Peek
- Export to HTML or continue with a full-scale Verge3D project
Autodesk Fusion (.f3d, .f3z)
Autodesk Fusion is a cloud-based software platform used for 3D design, manufacturing, and engineering.
Fusion to 3ds Max
You have 3 options:
- Export from Fusion to STEP, then use native 3ds Max's STEP importer to handle the conversion. You retain smooth, mathematically perfect surfaces and can manually adjust the tessellation (polygon density) slider inside 3ds Max upon import.
- Export from Fusion to FBX by converting your models into polygons right away. Import FBX to 3ds Max which allows for retaining the assembly structure and basic material assignments.
- If you use Autodesk Inventor, open your Fusion cloud designs directly inside Inventor, save them as native .ipt (part) or .iam (assembly) files, and then import those natively into 3ds Max using its built-in Autodesk Inventor importer.
Fusion to Blender
- Export from Fusion to FBX
- Import FBX to Blender via File → Import → FBX (.fbx)
- Optimize geometry, assign materials, setup camera and lighting
- Preview in the browser with the Sneak Peek button
- Export to HTML or continue with a full-scale Verge3D project
Fusion to Maya
- Export from Fusion to FBX
- In Maya invoke File → Import..., then select FBX
- Import the FBX asset to Maya
- Optimize geometry, assign materials, setup camera and lighting
- Preview in the browser with Verge3D → Sneak Peek
- Export to HTML or continue with a full-scale Verge3D project
AutoCAD (.dwg)
AutoCAD is one of the most popular computer-aided design software used by architects, engineers, and construction professionals.
AutoCAD to 3ds Max
Importing Autodesk AutoCAD files is supported by 3ds Max natively:
- Invoke File → Import → Import...
- Select AutoCAD Drawing (*.dwg, *.dxf) from the Files of type dropdown menu
- Import the CAD asset to 3ds Max
- Optimize geometry, assign materials, setup camera and lighting
- Preview in the browser with Verge3D → Sneak Peek...
- Export to HTML or continue with a full-scale Verge3D project

Also, check out the following tutorial video:
AutoCAD to Blender
- Export from AutoCAD to FBX
- Import FBX to Blender via File → Import → FBX (.fbx)
- Optimize geometry, assign materials, setup camera and lighting
- Preview in the browser with the Sneak Peek button
- Export to HTML or continue with a full-scale Verge3D project
AutoCAD to Maya
Use Autodesk Translation Framework (Windows only).
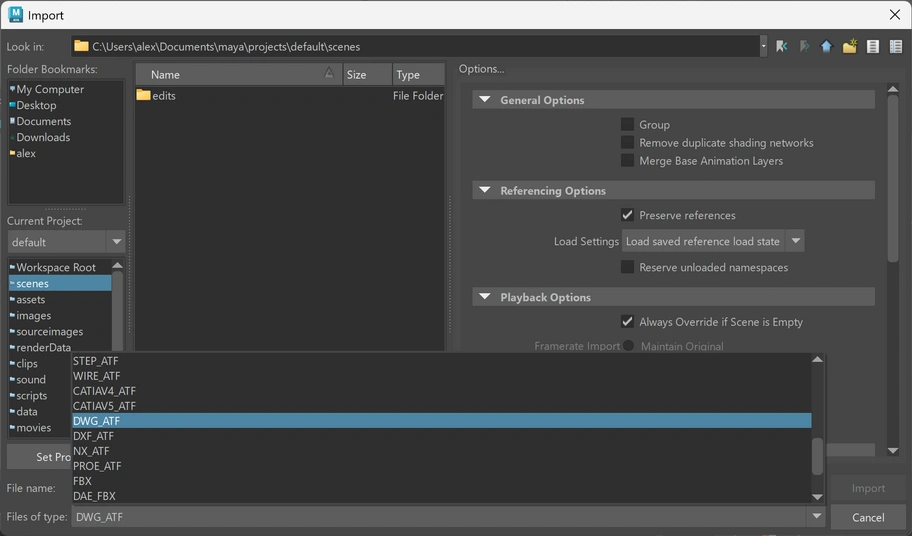
- Invoke File → Import..., then select DWG_ATF:
- Import the CAD asset to Maya
- Optimize geometry, assign materials, setup camera and lighting
- Preview in the browser with Verge3D → Sneak Peek
- Export to HTML or continue with a full-scale Verge3D project

BricsCAD (.dwg)
Cost-efficient alternative to AutoCAD. Works on Windows, macOS, Linux.
BricsCAD to 3ds Max
Simply save your project normally in your BricsCAD program to generate a .dwg file. Inside 3ds Max, navigate to File → Import → Import... and select the file.
BricsCAD to Blender
- Export from BricsCAD to FBX
- Import FBX to Blender via File → Import → FBX (.fbx)
- Optimize geometry, assign materials, setup camera and lighting
- Preview in the browser with the Sneak Peek button
- Export to HTML or continue with a full-scale Verge3D project
BricsCAD to Maya
Use Autodesk Translation Framework (Windows only).
- Invoke File → Import..., then select DWG_ATF
- Import the CAD asset to Maya
- Optimize geometry, assign materials, setup camera and lighting
- Preview in the browser with Verge3D → Sneak Peek
- Export to HTML or continue with a full-scale Verge3D project
IntelliCAD (.dwg)
IntelliCAD computer-aided design software that provides a 2D and 3D drafting engine compatible with AutoCAD files and commands.
IntelliCAD to 3ds Max
Simply save your project normally in your favorite IntelliCAD program to generate a .dwg file. Inside 3ds Max, navigate to File → Import → Import... and select the file. 3ds Max reads the Open Design Alliance (ODA) framework structure seamlessly.
IntelliCAD to Blender
- Export from IntelliCAD to OBJ
- Import OBJ to Blender via File → Import → Wavefront (.obj)
- Optimize geometry, assign materials, setup camera and lighting
- Preview in the browser with the Sneak Peek button
- Export to HTML or continue with a full-scale Verge3D project
IntelliCAD to Maya
Use Autodesk Translation Framework (Windows only).
- Invoke File → Import..., then select DWG_ATF
- Import the CAD asset to Maya
- Optimize geometry, assign materials, setup camera and lighting
- Preview in the browser with Verge3D → Sneak Peek
- Export to HTML or continue with a full-scale Verge3D project
STL (.stl)
Universal standard for rapid prototyping and 3D printing (stores surface mesh without color or metadata).
STL to 3ds Max
Importing STL files is supported by 3ds Max natively:
- Invoke File → Import → Import...
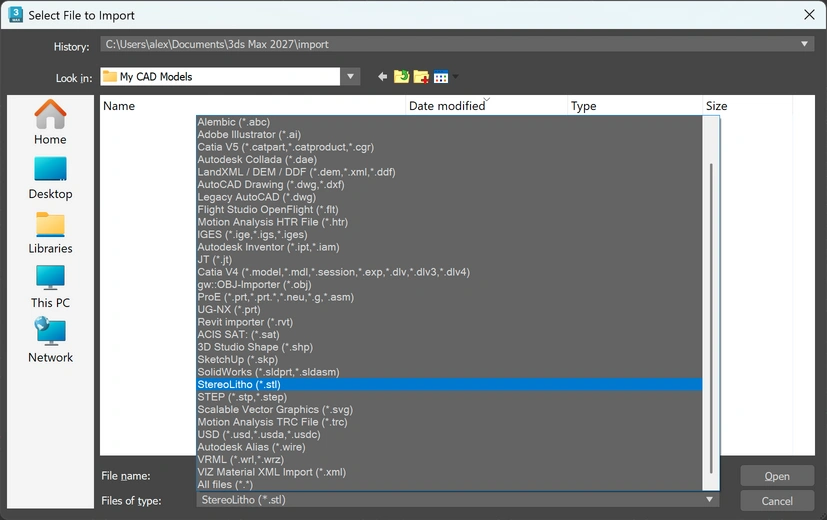
- Select StereoLitho (*.stl) from the Files of type dropdown menu:
- Import the CAD asset to 3ds Max
- Optimize geometry, assign materials, setup camera and lighting
- Preview in the browser with Verge3D → Sneak Peek...
- Export to HTML or continue with a full-scale Verge3D project

STL to Blender
Importing STL files is supported by Blender natively:
- Invoke File → Import → STL (.stl)
- Import the CAD asset to Blender
- Optimize geometry, assign materials, setup camera and lighting
- Preview in the browser with the Sneak Peek button
- Export to HTML or continue with a full-scale Verge3D project
STL to Maya
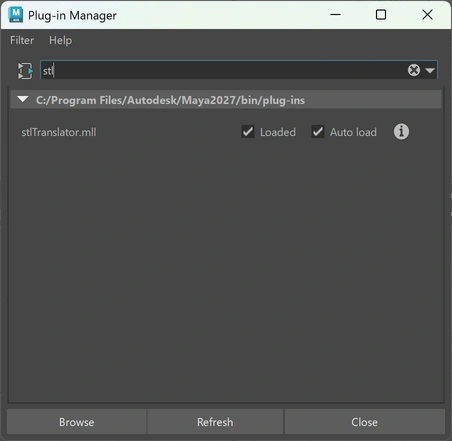
Maya supports importing STL files via the built-in stlTranslator plugin.
- Make sure stlTranslator in enabled in the Maya Plug-in Manager:
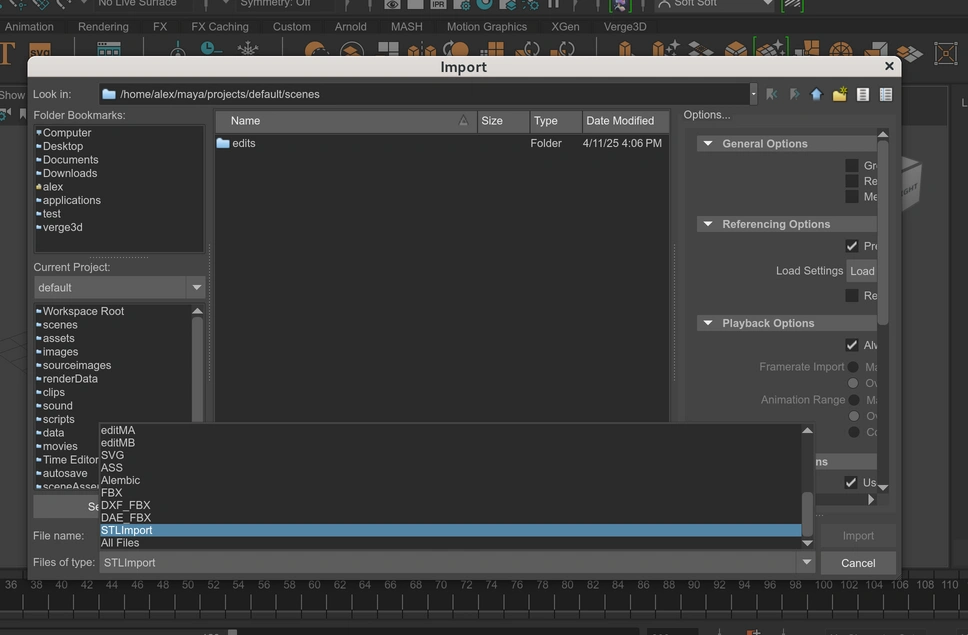
- Invoke File → Import...
- Select STLImport from the Files of type dropdown menu:
- Import the CAD asset to Maya
- Optimize geometry, assign materials, setup camera and lighting
- Preview in the browser with Verge3D → Sneak Peek...
- Export to HTML or continue with a full-scale Verge3D project


PLY (.ply)
Polygon File Format. Text-based file format designed to store three-dimensional data from 3D scanners.
PLY to 3ds Max
If your .ply file is a conventional 3D polygonal model (such as a 3D scan or sculpture) your have 2 options:
- Use a plugin. Download the free gw::PlyIO plugin by GuruWare (available on MaxPlugins.de). This adds a dedicated PLY import/export utility to your main menu.
- The MeshLab Conversion. Import your .ply file into MeshLab or Blender. Resave/export the asset as an OBJ or FBX file, which 3ds Max handles flawlessly out of the box.
PLY to Blender
If your .ply file is a conventional 3D polygonal model, Blender can import it natively via File → Import → Stanford (.ply).

PLY to Maya
If your .ply file is a conventional 3D polygonal model:
- Import PLY file in Blender via File → Import → Stanford (.ply)
- Export your scene to FBX via File → Export → FBX (.fbx)
- Import FBX in Maya via File → Import..., select FBX.
- Optimize geometry, assign materials, setup camera and lighting
- Preview in the browser with Verge3D → Sneak Peek
- Export to HTML or continue with a full-scale Verge3D project
Rhinoceros 3D aka Rhino (.3dm)
It is widely considered an industry standard for freeform surface modeling, complex organic geometry, and computational design across several enterprise sectors. Works on Windows and macOS.
Rhino has one important advancement over traditional parametric CAD, being able to create and work with polygonal meshes.
Rhino to 3ds Max
- Create optimized polygonal meshes for the models you need to export (e.g. with QuadRemesh or Mesh commands)
- Export your Rhino scene to FBX via File → Export Selected... → MotionBilder (.fbx)
- Import FBX in 3ds Max: invoke File → Import → Import..., then select FBX (.fbx)
- assign materials, setup camera and lighting
- Preview in the browser with Verge3D → Sneak Peek
- Export to HTML or continue with a full-scale Verge3D project
Also, check out the article Using Rhinoceros for creating interactive WebGL visualizations for more details.
Rhino to Blender
- Create optimized polygonal meshes for the models you need to export (e.g. with QuadRemesh or Mesh commands)
- Export from Rhino to FBX via File → Export Selected... → MotionBilder (.fbx)
- Import FBX to Blender via File → Import → FBX (.fbx)
- assign materials, setup camera and lighting
- Preview in the browser with the Sneak Peek button
- Export to HTML or continue with a full-scale Verge3D project
Also, check out the article Using Rhinoceros for creating interactive WebGL visualizations for more details.
Rhino to Maya
- Create optimized polygonal meshes for the models you need to export (e.g. with QuadRemesh or Mesh commands)
- Export from Rhino to FBX via File → Export Selected... → MotionBilder (.fbx)
- Import FBX to Maya: invoke File → Import..., then select FBX
- assign materials, setup camera and lighting
- Preview in the browser with Verge3D → Sneak Peek
- Export to HTML or continue with a full-scale Verge3D project
Also, check out the article Using Rhinoceros for creating interactive WebGL visualizations for more details.
FreeCAD (.FCStd)
Free 3D parametric modeling software. Available for Windows, macOS, Linux.
FreeCAD to 3ds Max
The most straightforward approach is exporting to STEP, then using native 3ds Max STEP importer as suggested above.
FreeCAD to Blender
- Export your FreeCAD asset to OBJ
- Import OBJ to Blender via File → Import → Wavefront (.obj)
- Optimize geometry, assign materials, setup camera and lighting
- Preview in the browser with the Sneak Peek button
- Export to HTML or continue with a full-scale Verge3D project
Also, see the following tutorial video:
FreeCAD to Maya
The most straightforward approach is exporting to STEP, then using Maya's ATF importer as suggested above.
SketchUp (.skp)
SketchUp is an easy-to-use and intuitive CAD program. It used mainly for fast 3D concept design, architectural modeling, and interior planning. Pro version is available for Windows and macOS.
Contrary to other CAD tools, SketchUp uses polygonal modeling techniques, which simplify exporting to DCC software.
SketchUp to 3ds Max
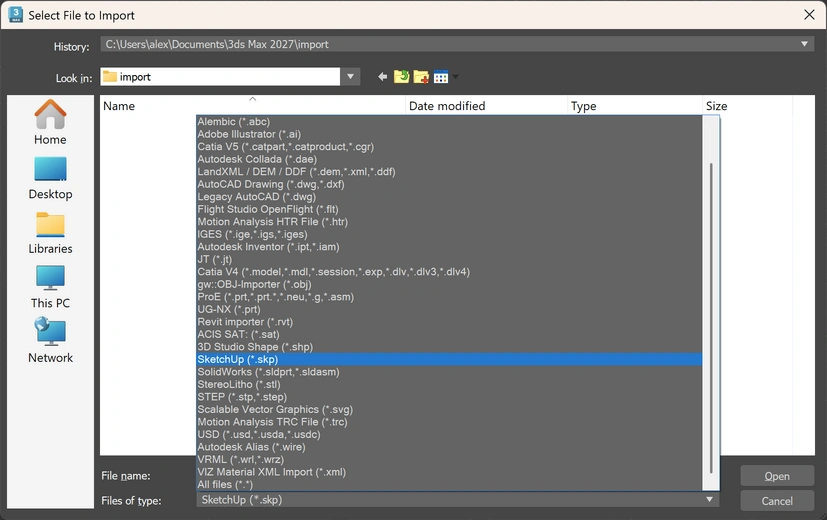
Importing SketchUp files is supported by 3ds Max natively:
- Invoke File → Import → Import...
- Select SketchUp (*.skp) from the Files of type dropdown menu:
- Import the CAD asset to 3ds Max
- Tweak materials, setup camera and lighting
- Preview in the browser with Verge3D → Sneak Peek...
- Export to HTML or continue with a full-scale Verge3D project

SketchUp to Blender
There is no built-in support for SketchUp files in Blender. However, you can use the FBX export feature provided in SketchUp Pro.
- Export from SketchUp to FBX
- Import FBX to Blender via File → Import → FBX (.fbx)
- Assign materials, setup camera and lighting
- Preview in the browser with the Sneak Peek button
- Export to HTML or continue with a full-scale Verge3D project
SketchUp to Maya
There is no built-in support for SketchUp files in Maya. However, you can use the FBX export feature provided in SketchUp Pro.
- Export from SketchUp to FBX
- In Maya invoke File → Import..., then select FBX
- Import the FBX asset to Maya
- Assign materials, setup camera and lighting
- Preview in the browser with Verge3D → Sneak Peek
- Export to HTML or continue with a full-scale Verge3D project
How to optimize geometry imported from CAD
Since a typical CAD software stores geometry as parametric surfaces / NURBS (e.g. B-Rep), you can get millions of polygons after tessellation. However, a web-based nature of Verge3D requires you to have low-poly to middle-poly meshes (~100K triangles). This means, it is essential to reduce polygons while preserving visual fidelity of your geometry.
General approach to this issue would be:
- Import high-poly mesh into Blender, 3ds Max, or Maya
- Retopologize the mesh (manually or with the built-in tools, e.g. modifiers) to make it low-poly
- Bake Normal map to fake the high-detail lighting (this step is optional, though highly recommended)
How to assign materials on meshes imported from CAD
One of the easiest methods would be using material libraries provided as paid additions to the Verge3D toolkit. These asset packs are designed for typical CAD use cases and optimized for real-time rendering. Individual materials provide options for fine-tuning and passing additional Normal and Ambient Occlusion maps.
Pay attention to the “Machinery” packs, which can be used for various industries such as:
- automotive/vehicles
- home appliances and medical devices
- engineering and construction
- aerospace
- shipbuilding
- agriculture and mining
- transportation and warehousing
- machine tools and manufacturing
- electrical equipment and power generation
- robotics
See also
Check out these beginner-level guides if you have no prior experience with Verge3D and need to get started fast:
Verge3D for 3ds Max: Beginner's Guide

